
From Almost There to Perfect: Using the Edit Module to Refine AI Design Outputs
Sometimes, even your best prompt won’t get you all the way to the image you need. Maybe the garment is perfect, but the face is off. Or you want colors placed in very specific areas. That’s when it’s time to stop prompting and start editing.
Raspberry’s Edit Module gives you hands-on tools to fine-tune your AI-generated images — from precision masking for targeted color changes to fabric and texture refinement — without starting from scratch. In this post, we’ll cover when to switch from prompting in other modules to Edit, and which tools can take your designs from almost there to spot on.
Signs Prompting Alone Won’t Cut It
Prompting is powerful — but it has limits. It’s usually time to move into Edit when you notice:
- Complex garment details aren’t rendering correctly
(missing seamlines, incorrect pocket placement, uneven proportions) - Small visual errors or artifacts
(extra buttons, warped seams, drag lines) - Color or print changes need to be placed precisely
(specific panels, trims, or sections — not the entire garment)
If your prompt keeps getting longer and more specific but the issue persists, that’s your signal: it’s time to take your asset to the Edit Module.
Edit Module Tools That Shine
Overall edits with AI Prompts (no masking)
Use this when the change applies to the entire image:
- Adjusting overall fit or proportion
- Refining or changing silhouette
- Correcting broad styling issues
Silhouette Transformation Example
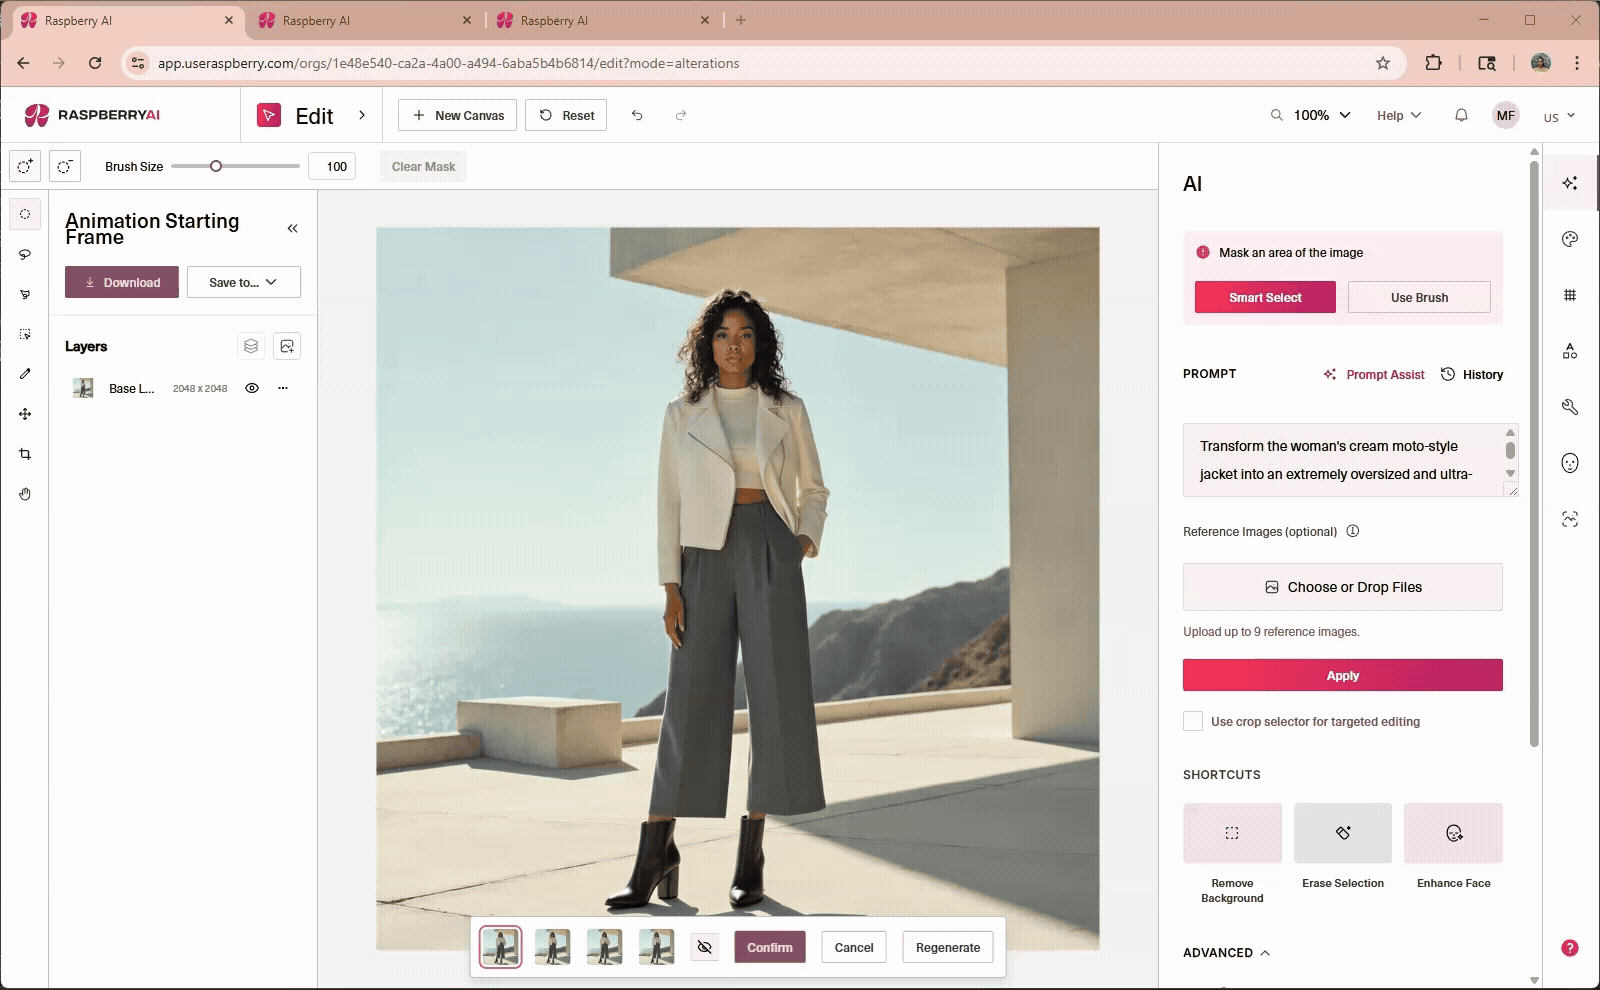
Transform the woman's cream moto-style jacket into an extremely oversized and ultra-cropped cream jacket, with a voluminous, boxy silhouette that ends significantly above her waistline, revealing more of her midriff. All other elements, including her confident pose, expression, curly hair, cream high-neck crop top, grey pleated culottes, black ankle boots, the architectural background, and bright natural lighting, must remain precisely the same.
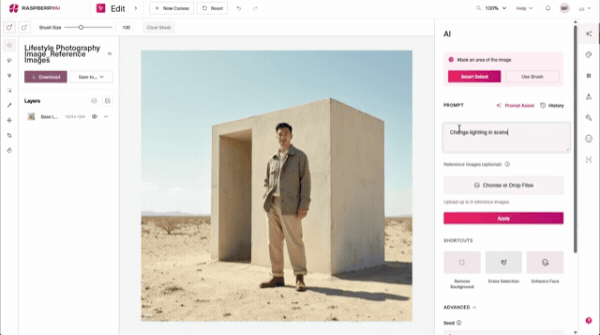
Targeted edits with AI Prompts and optional reference images (no masking)
Use Prompt Assist and optional reference images in AI Prompts for targeted editing when you don’t mind changes to the overall image:
- Write a prompt specifying desired edit and use Prompt Assist
- Add reference images to guide the AI toward a specific look or detail
- Tweaks are made to the overall image to smoothly integrate the edit
- Use the phrase “Keep all other details the same.” to anchor the rest of the scene
Example Original prompt
Change lighting in scene to match reference image.
Improved prompt after using Prompt Assist
Transform the bright daylight desert scene into a dramatic, star-filled night, replicating the deep blue and purple cosmic sky, visible nebulae, and diffused starlight from the reference image. The man, his green jacket, beige pants, brown boots, the concrete structure, and the desert landscape should all be softly illuminated by this celestial glow, casting long, subtle shadows consistent with the low, ambient nighttime lighting of the reference.
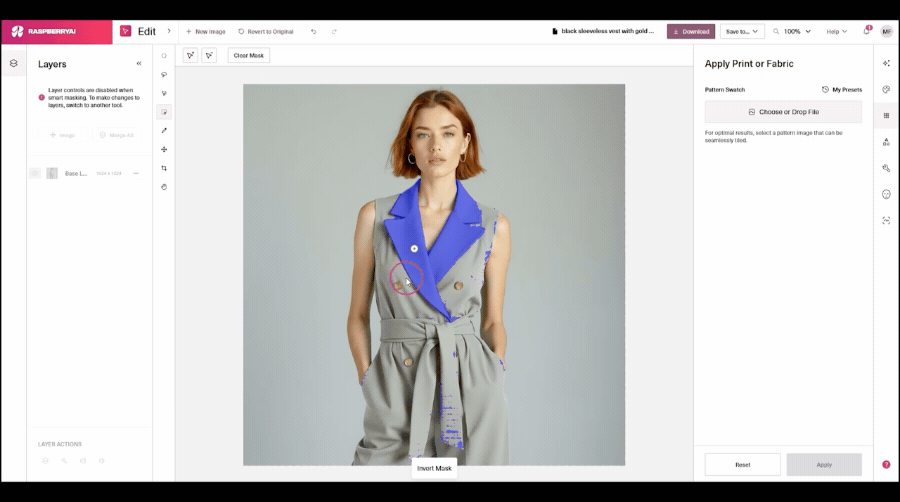
Precision edits with Masking and AI Enhance (Color & Apply Prints)
Use masks when only part of the image needs to change:
- Color changes on specific panels
- Applying prints to select areas
- Isolating trims, collars, sleeves, or pockets
- AI Enhance improves the depths, folds and fabric definition of the output
Erase Selection
Best for cleanup and corrections:
- Remove stray seamlines
- Eliminate unwanted buttons or hardware
- Fix drag lines or distortions
Removing Button Example:
Erase a stray button on a shirt.
Example Workflows
1. Specifying Color Placement
Problem:
Prompting recolors the entire garment when you only want select areas adjusted.
Scenario:
A color-blocked knit has the right silhouette, but the ribbed hem and cuffs need to be a contrasting color.
Edit approach:
- Enter the Edit Module
- Mask the hem and cuffs
- Apply Color with AI Enhance to the masked sections
Result:
Precise color placement without regenerating the full image.
2. Changing a Face While Keeping Garment Details
Problem:
The styling and outfit are strong, but the model’s face feels off.
Scenario:
A lifestyle image looks great overall, but the facial expression distracts from the product.
Edit approach:
- Create headshot in Lifestyle Photography
- Use Edit | Face Swap
Result:
A refreshed face with zero impact on the outfit.
.gif)
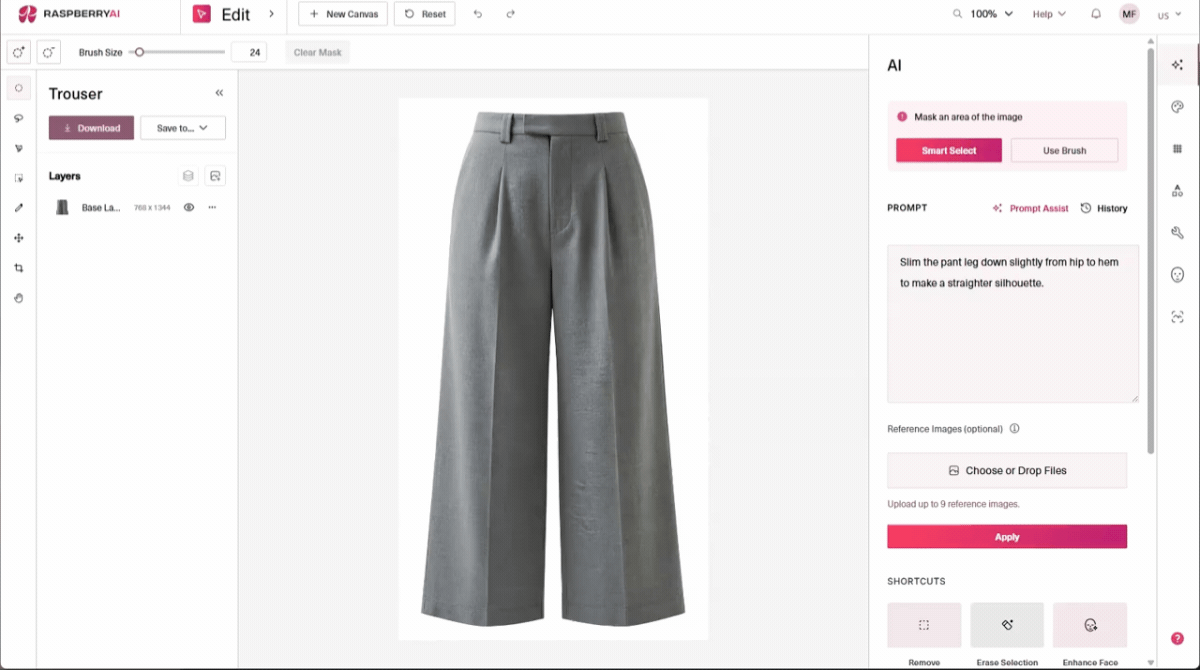
3. Adjusting Fit Without Regenerating Everything
Problem:
The design is close, but the proportions feel slightly wrong.
Scenario:
A tailored trouser looks a bit too full through the leg.
Edit approach:
- Use Edit AI Prompts (no masking)
- Prompt for subtle fit refinement
- Use Prompt Assist to improve your prompt
Example Original prompt:
Slim the pant leg down slightly from hip to hem to make a straighter silhouette.
Improved prompt after using Prompt Assist:
Gently slim the pant leg of the grey trousers from the hip all the way down to the hem, creating a subtly straighter, more tailored silhouette. All other details, including the grey fabric, the crisp front pleats, the waistband with belt loops, and the clean white background with even lighting, should remain exactly as they are.
Result:
Improved fit without losing the design you already like.
Best Practices
- Use Prompt Assist! Prompt Assist reads your reference images and helps turn vague instructions into clear, detailed prompts — especially powerful in Edit.
- Duplicate before major edits: Always duplicate and save your layer before making significant changes, so you can compare or revert if needed.
- Merge Layers to see final resolution. After edits your resolution may seem blurred. Merge your layers or download to see the actual resolution of your output.
Prompting in other tools will always be the starting point to get your initial image, but the Edit Module is where your designs can truly be perfected. With the right edits, you can correct tiny details, enhance textures, and create exactly the image you need without losing the magic of the AI-generated foundation. Together, good prompting and skillful editing give you the best of both worlds: speed, creativity, and precision.
Now it’s your turn to experiment! Try chaining prompts, refine your approach, and then use Edit as your final polish. Your most striking designs are just a few thoughtful steps away.
Heading 1
Heading 2
Heading 3
Heading 4
Heading 5
Heading 6
Lorem ipsum dolor sit amet, consectetur adipiscing elit, sed do eiusmod tempor incididunt ut labore et dolore magna aliqua. Ut enim ad minim veniam, quis nostrud exercitation ullamco laboris nisi ut aliquip ex ea commodo consequat. Duis aute irure dolor in reprehenderit in voluptate velit esse cillum dolore eu fugiat nulla pariatur.
Merchandising and design now create together live in meetings—no more weeks of back and forth.”
[[VP of Merchandising] blog-quote-ttl]
[[$30M alternative eCommerce fashion retailer] blog-quote-subttl]
Quote Name Style
Ordered list
- Item 1
- Item 2
- Item 3
Unordered list
- Item A
- Item B
- Item C
Bold text
Emphasis
Superscript
Subscript

Why Raspberry AI is the Only Creative AI on the CB Insights 2026 AI 100
CB Insights evaluated more than 40,000 AI companies worldwide. 100 made the cut. Raspberry AI is the only one built for creative teams — and the data behind the selection tells a clear story about where fashion AI is headed.

How AI Can Help Fashion Brands Weather Tariff Uncertainty
In April, tariff rates on goods imported from China jumped to an unprecedented 125%. See how creative teams use generative AI to protect their bottom line.
Visualize Your Product Displays | Raspberry AI
Turn planograms and display diagrams into photoreal, retail-ready mockups with Raspberry AI’s Edit Module—ideal for merchandising, VM, and buyer presentations.
Sign Up for Our Newsletter
We’re constantly enhancing our product. Stay informed with the latest updates.
Ready to Design Smarter, Faster, and at Scale?
Start creating stunning photorealistic designs in just a few clicks.